It is a high performance web server that is responsible for handling the load of some of the largest and high traffic websites on the internet.
In this Tutorial we will show you How to install LEMP on your CentOS 6.7 Server. LEMP is a software bundle that is made up of four parts (Linux, Nginx, MySQL, and PHP). In this Tutorial we will be using CentOS 6.7 which was released on August 7th, 2015, Nginx version 1.0.15, MySQL version 5.1.73 and php-fpm using PHP version 5.3.3.
Prerequisites
we will require a VPS or a Dedicated server with Centos 6.7 64bit. you can get one from here.
Installing EPEL in CentOS 6.7 for LEMP
First we will install the Fedora epel release to quickly install Nginx. Run the following command to install EPEL
yum install epel-release
Installing and Configuring NGINX in CentOS 6.7 for LEMP
Install NGINX with the following command:
sudo yum install nginx
Start the NGINX service with the following command:
sudo /etc/init.d/nginx start
Configure NGINX to start when the system is rebooted:
sudo chkconfig nginx on
You will now have NGINX installed on your server. This can be verified by typing in the following with your IP ADDRESS on your browser. Also, all configuration files are provided on the page.
We can now verify Apache is working by opening your browser and entering the URL http://your-server’s-address. you should get a blue Nginx test page similar to the image below.
Note: If you do not know your IP address, run the following command:
sudo ip addr show eth0
In our example we would put http://192.168.100.10 into our browser’s address bar.
Installing and Configuring MySQL on CentOS 6.7 for LEMP
Install MySQL with the following command to begin the install:
sudo yum install mysql-server
Start the service with the following command:
sudo service mysqld start
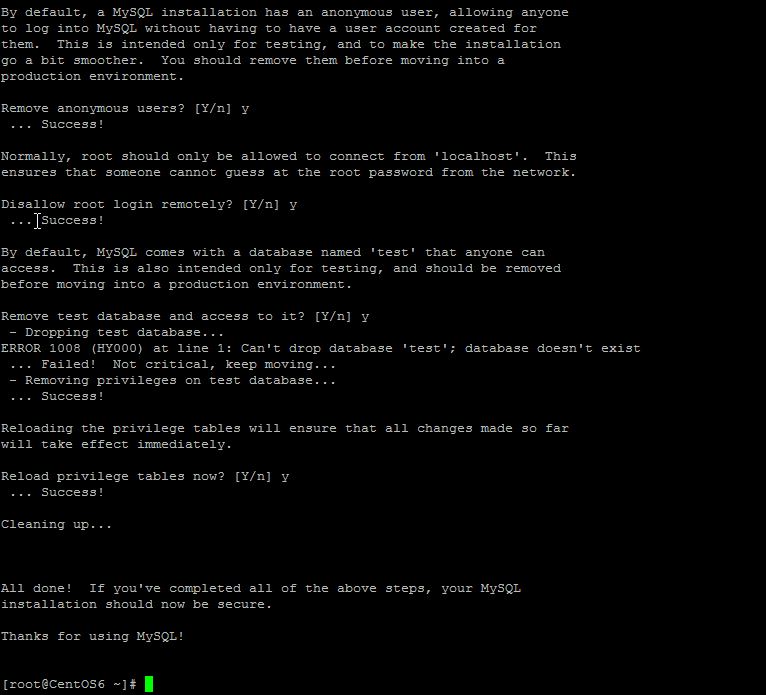
Set root MySQL password with the following command:
sudo /usr/bin/mysql_secure_installation
Note: You will be prompted with a series of questions. Just type Y for yes on all of them, see the screen shot below:
Configure MySQL to start when the system is rebooted:
sudo chkconfig mysqld on
Installing and Configuring php-fpm on CentOS 6.7 for LEMP
Install php-fpm with the following command:
sudo yum install php-fpm php-mysql
Start the php-fpm service with the following command:
sudo service php-fpm restart
Make sure php-fpm starts on boot with the following command:
sudo chkconfig php-fpm on
Using your favorite editor, edit the file /etc/php-fpm.d/www.con and change user and group from apache to nginx. It should look similar to the block below.
; Unix user/group of processes
; Note: The user is mandatory. If the group is not set, the default user’s group
; will be used.
; RPM: apache Choosed to be able to access some dir as httpd
user = nginx
; RPM: Keep a group allowed to write in log dir.
group = nginx
Now we need to make some changes to the Nginx configuration file so that php-fpm works correctly with Nginx. Using your favorite editor, edit the file /etc/nginx/conf.d/default.conf and carry out the following changes or copy the following block below into your conf file.
1) Add the index.php to the index location
2) Change the root location to /usr/share/nginx/html
3) Uncomment the Pass PHP scripts to FastCGI section.
4) Change the fastcgi_param SCRIPT_FILENAME to use /usr/share/nginx/html$fastcgi_script_name
#
# The default server
#
server {
listen 80 default_server;
server_name _;
#charset koi8-r;
#access_log logs/host.access.log main;
# Load configuration files for the default server block.
include /etc/nginx/default.d/*.conf;
location / {
root /usr/share/nginx/html;
index index.php index.html index.htm;
}
error_page 404 /404.html;
location = /404.html {
root /usr/share/nginx/html;
}
# redirect server error pages to the static page /50x.html
#
error_page 500 502 503 504 /50x.html;
location = /50x.html {
root /usr/share/nginx/html;
}
# proxy the PHP scripts to Apache listening on 127.0.0.1:80
#
#location ~ \.php$ {
# proxy_pass http://127.0.0.1;
#}
# pass the PHP scripts to FastCGI server listening on 127.0.0.1:9000
#
location ~ \.php$ {
root /usr/share/nginx/html;
fastcgi_pass 127.0.0.1:9000;
fastcgi_index index.php;
fastcgi_param SCRIPT_FILENAME /usr/share/nginx/html$fastcgi_script_name;
include fastcgi_params;
}
# deny access to .htaccess files, if Apache’s document root
# concurs with nginx’s one
#
#location ~ /\.ht {
# deny all;
#}
}
Create a test PHP file in the following directory with the following command:
sudo vi /usr/share/nginx/html/info.php
Insert the following code in the space then save and exit:
Restart apache so all the changes take effect:
sudo service nginx restart
Test your page in your browser with the following hyperlink changed with yourIP address:
http://YOUR.IP.ADD.RESS/info.php
You should removed the info.php file as it could be used against you by an attacker. Delete it with the following command:
sudo rm /usr/share/nginx/html/info.php
Congratulations! You have just installed LEMP on your CentOS 6.7 Server. Thank you for reading.
HTML, or HyperText Markup Language, is the essential language for structuring and presenting content on the internet. It’s the foundation upon which all web pages are built, enabling browsers to display text, images, links, videos, and other multimedia content. Understanding HTML is the first step in any web development journey, and its versatility makes it…
ERR_SSL_PROTOCOL_ERROR is an error message that indicates an issue with the secure connection between your browser and a website. This problem commonly arises when accessing an HTTPS website, signaling that the SSL (Secure Sockets Layer) handshake is failing. While it might seem complicated, solving this error involves several straightforward steps. Here’s a comprehensive guide to…
Web hosting is a fundamental aspect of website management that significantly impacts your site’s SEO performance. While often overlooked, the quality and characteristics of your web hosting can influence your site’s speed, uptime, security, and overall search engine rankings. This article delves into the intricate relationship between web hosting and SEO, providing expert tips on…
Here’s a complete guide to Install Java on Ubuntu 24.04. In this article, we’ll walk you through installing the latest version of Java on Ubuntu 24.04, using both OpenJDK and Oracle JDK options. This guide also includes managing multiple installations, configuring environment variables, and verifying your setup to ensure compatibility with Java-based applications. With Ubuntu…
Introduction Databases are the backbone of modern applications, providing a robust and scalable way to store, retrieve, and manage data. Two of the most popular database management systems (DBMS) are MariaDB and MySQL. While they share a common ancestry, they have diverged over the years, each offering unique features and capabilities. This article delves into…
The err_cache_miss error is one of those frustrating obstacles that can pop up during everyday browsing, primarily when using Google Chrome. Often associated with form submissions and page reloading issues, this error message is typically displayed as “Confirm form resubmission” and stems from problems with the browser cache. In this article, we’ll take an in-depth…